Examples of Chord Shapes and Chord Voicings
For any musical instrument or choir, a chord voicing is the specific ordering and “vertical” (i.e., harmonic) spacing of the notes in a chord: Which notes are on the bottom, in the middle and on the top, and how close or "spread out" the notes are to each other.
A guitar chord shape is an easily visualized representation of a chord voicing with each note identified by two things: (1) string, and (2) fret (or open string indication: "O", "0" or circle). Chord shapes are commonly illustrated either of two ways: (1) A vertical set of fret numbers overlayed on a “staff” of six horizontal lines representing the strings, as in tablature notation, or (2) A chord diagram (or “chord box”). You might recall this from lesson 1b:
Any chord can be played using different voicings, but each of those voicings of the same chord requires a different shape because it’s a different combination of notes. Conversely, a specific chord voicing can be played using different shapes on a guitar. For good or bad, the multiplicity of shapes for the same voicing is blamed on the “Guitarist’s Pitfall” explained in Lesson 1b. For example, consider this C triad voicing with an E note at the top and a G note on the bottom, shown here in standard music notation (without octave shift) on a Grand Staff. Below that are three chord diagrams, each illustrating a different shape for that same voicing of the C chord:
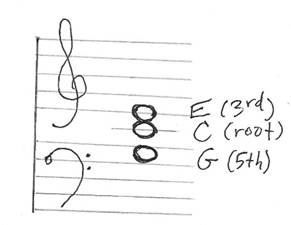
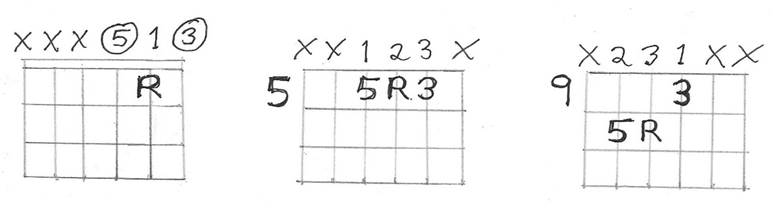
The first of the three chord diagrams above illustrates a shape in “open” position including two notes played on open strings. Above each open string is a circle enclosing the note’s interval number within the given chord. The second and third chord diagrams above each have a fret number on the left to indicate their upper positions on the fretboard. In all three examples, instead of using a black dot to locate the fret and string for each fretted note, the location is indicated by the placement of a symbol such as R, 3 or 5 to indicate the note’s interval number. Those three chord diagrams are examples of “optimally descriptive chord diagrams” explained later.
Chord Inversions
Certain types of chord voicings are formally classified according to which note is the lowest in the chord. If the lowest note is the root, the inversion is called “root position”. (But root position is NOT called “first inversion”.) A chord inversion is a chord voicing in which the bottom note is NOT the root of the chord. If the lowest note’s interval within the voicing is the 3rd or the 5th, it’s called “first inversion” or “second inversion”, respectively.
Technically, any chord can be voiced such that any of its constituent notes is the lowest one, and there is generalized way of denoting this in chord symbols: Slash chords. A slash chord is one including a slash character (“/”) to indicate which note is “in the bass”, i.e., the bottom of the chord. For example, we can simply use the symbol “C” to represent the C Major triad voicing illustrated above as three different shapes. That chord voicing has a G note on the bottom, so it can also be given the more descriptive chord symbol “C/G”. (In practice, however, triads in the first and second inversions are so common they’re often given the simpler chord symbol without a slash.)
Good examples of slash chords are included in this arrangement of Paul McCartney’s “Maybe I’m Amazed”: https://www.musicnotes.com/sheetmusic/mtd.asp?ppn=MN0054041. The first four chords are represented by the symbols B♭, F/A, C and G/C. The fourth one is unusual; it would have the chord name “G over C” or “Gadd4 with C in the bass”:

Optimally Descriptive Chord Diagrams
For the remainder of this lesson we’ll use these conventions for chord diagrams:
· Numbers labeling the strings are unnecessary; from left to right they’re always 6,5,4,3,2,1.
· Black dots can be replaced by symbols such as R, 3, 5, 7, etc. to indicate the note’s interval.
· When the top horizontal line represents the nut or capo, any number above the line that’s not enclosed in a circle identifies the fretting finger for that string; otherwise, it’s an open string with the circle at the top enclosing a symbol indicating the note’s interval number.
· A fret number on the left of the box specifies a fret position relative to the nut or capo. Such fret numbers are sometimes shown as Roman numerals because the writer wants to prevent the reader from possibly confusing fret numbers with Arabic numerals (indicating interval numbers) used instead of plain black dots to indicate fret and string.
· In some diagrams, a note played on the 1st string or the 6th string is considered optional because the additional note might be more trouble than it’s worth in terms of difficulty. In that case the interval number (placed to indicate fret and string) and the corresponding finger number above the top of the box are both enclosed in parentheses.
Study such chord diagrams carefully because a lot of info is packed into each one. A number in the diagram specifies one of three different things: interval number, fretting finger or fret number.
The following section copied from “Guitar Cookbook” by Jesse Gress illustrates many triads and how the shapes can be moved across adjacent strings. (But this is not what is meant by the term “movable shapes”, as explained later in this lesson.) We’ll forgive the author for referring to Suspended chords as “Sus2 Triads” and “Sus4 Triads”, although many music theorists don’t consider suspended chords to be triads. Evidently, the author lumped them in with the collection of triads as a convenient way to categorize them.
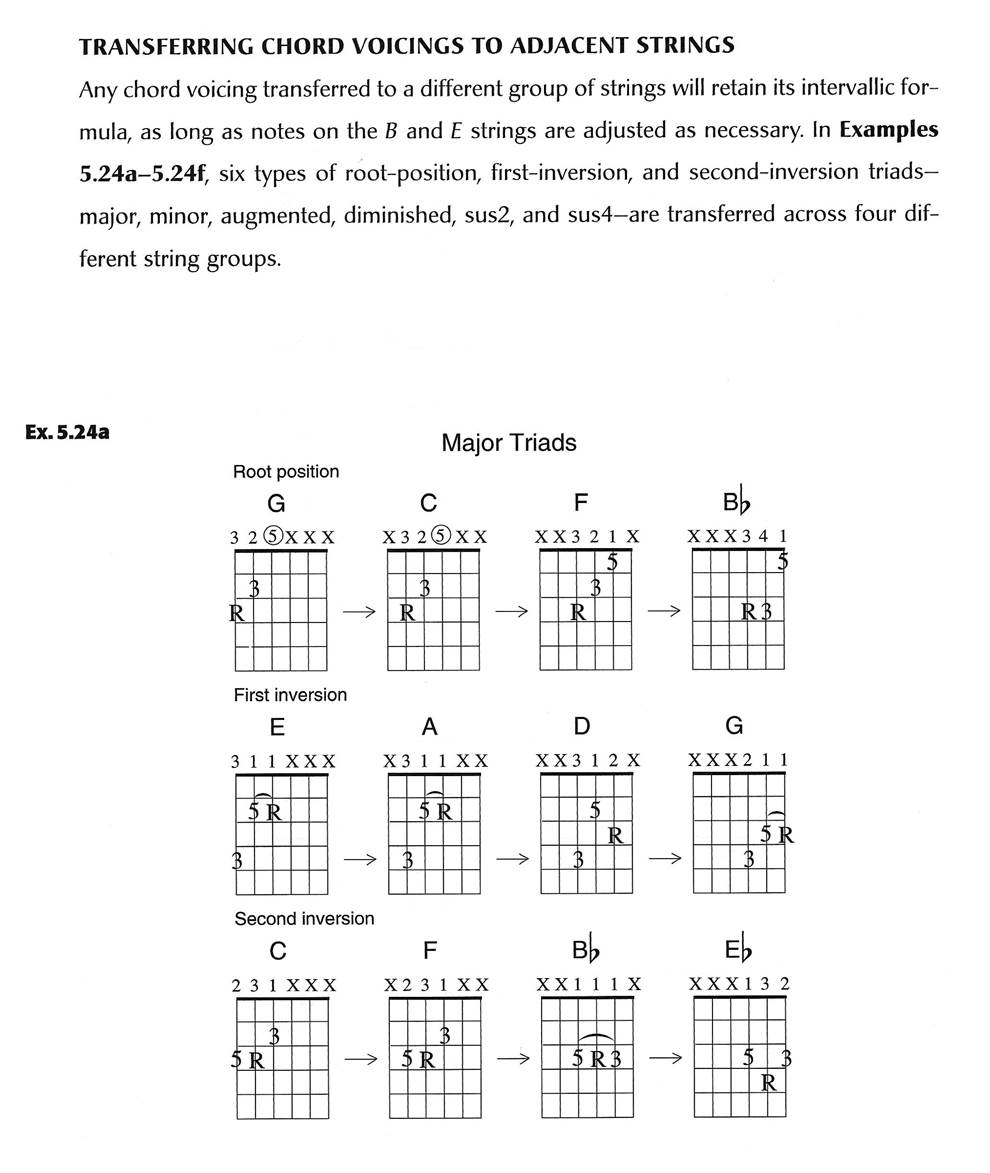


Referring back to Augmented chords and Diminished chords on the preceding two pages, note the chord symbols used for those two types of triads. Chord symbols shown for Augmented chords include a plus sign (“+”) but their chord symbols can alternatively include the suffix aug, as in Gaug, for example. Chord symbols shown above for Diminished chords include a small “o”, but their chord symbols can alternatively include the suffix dim, as in A♭dim, for example.
Movable Shapes
Now study the following set of shapes for many E chord variations. The Roman numeral V to the left of each diagram indicates fret 5, so these shapes all in in the portion of the fretboard from fret 4 through fret 8. But these shapes all have the very useful property of being movable chord shapes, i.e., each can be easily transposed (to an equivalent chord in a different key) simply by moving the shape up or down the fretboard. So, you learn this set of shapes for chords in E, then “for free” you’ll know them for other keys as well. The top diagram is a Major Scale pattern given the temporary name “Pattern 1”, but that’s just a hint to the benefits of the comprehensive system of patterns called CAGED discussed later in Lesson 5.

Now study this second set of chord shapes for E chord variations, all in in the portion of the fretboard from fret 6 through fret 10. Again, they all have the very useful property of being movable chord shapes. The first diagram below is a Major Scale pattern temporarily identified using the non-standard name “Pattern 2”. It’s a hint to the usefulness of the CAGED method that will teach you five different movable shapes for any specific chord or scale, each in a different region of the fretboard so you can choose the best shape for wherever your left hand happens to be at the point in a song when you need that specific chord or scale.
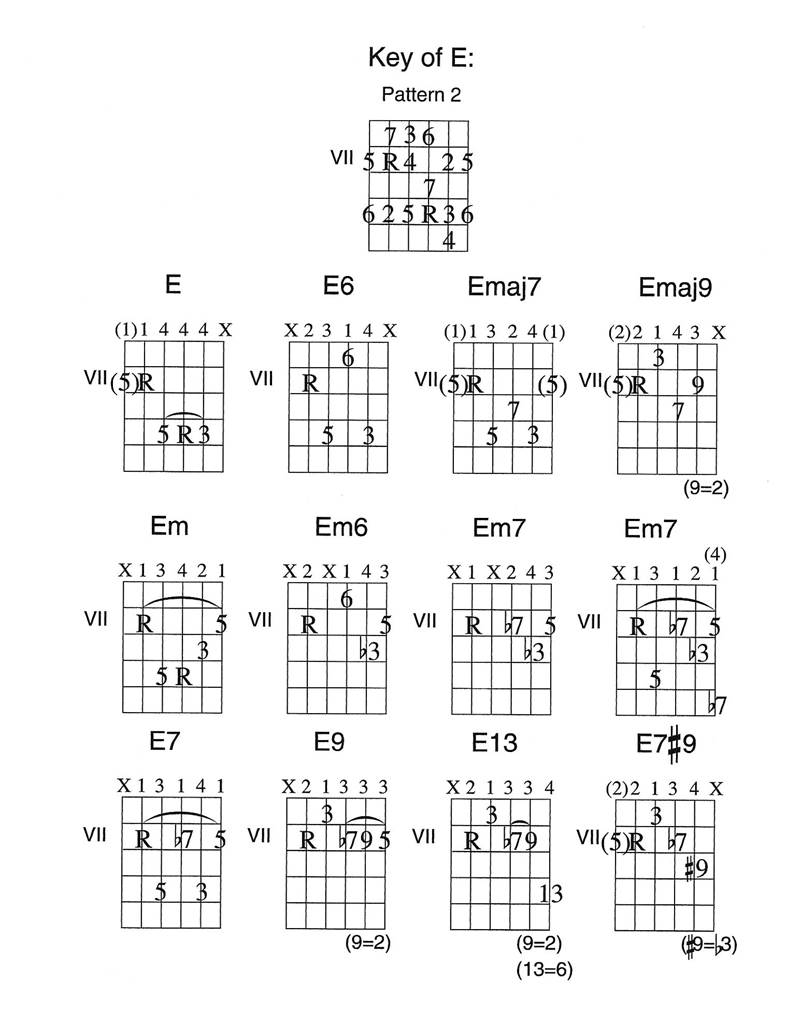
Note the diagram above for the extended chord E13. The shape shown for it does not include all the notes necessary to play the chord correctly. That shape is an example of a “shell” voicing, a concept explained in Lesson 6.