Movable Chord Shapes Versus Open Chord Shapes
You probably know chords such as Dm and G7 and all the other "Cowboy chords". That's a derisive term referring to the popular set of open chord shapes played exclusively on the first three frets beyond the nut or capo. Because they each include one or more open strings, they're not considered movable because we can't easily transpose the chord by sliding the chord shape down the fretboard (e.g., futilely attempt to transform the C chord shape into a D chord by sliding the chord shape down two frets, then strumming the same five or six strings). If this limitation is not an issue for you, perhaps because you're adept at transposing with a capo, you probably have no need to learn CAGED. On the other hand, if you want to learn movable shapes, read on. The benefit of movable shapes is the ability to use a chord shape at any position up or down the fretboard, so you can easily transpose the chord simply by "sliding" the shape up or down.
What is CAGED?
Often referred to as the “CAGED System”, CAGED is a method of visualizing a standardized collection of movable chord shapes and scale patterns to allow a guitarist to play up and down the fretboard with ease. The specific ordering C, A, G, E and D is important, as we shall see later.
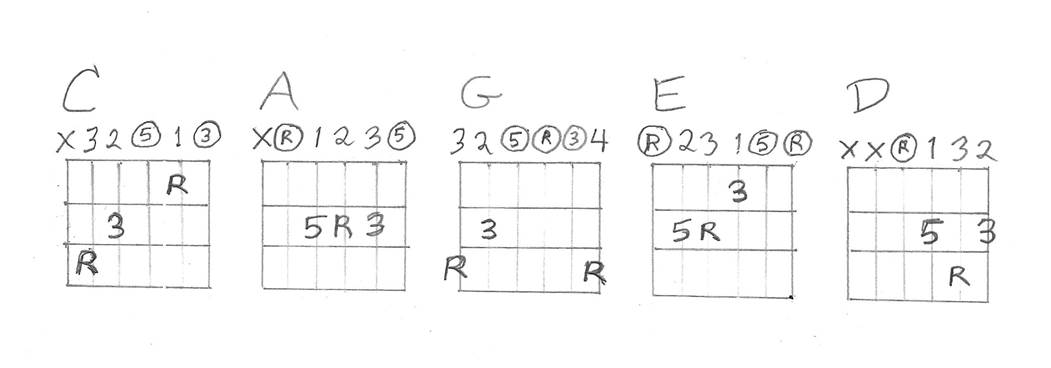
Fundamentally, CAGED is based on the following five open chord shapes you already know. (Recalling from chord diagram conventions introduced in Lesson 4: When the top horizontal line represents the nut or capo, any number above the line that’s not enclosed in a circle identifies the fretting finger for that string; otherwise, it’s an open string with the circle at the top enclosing a symbol indicating the note’s interval number.)
Each of the five shapes above relies on one or more open strings, so it can only be used just below the nut or capo. Let’s modify each of those open shapes slightly by rearranging the grip to replace the notes played on open strings with fretted notes. Now we the five CAGED Chord Forms. Each is useful anywhere on the fretboard:
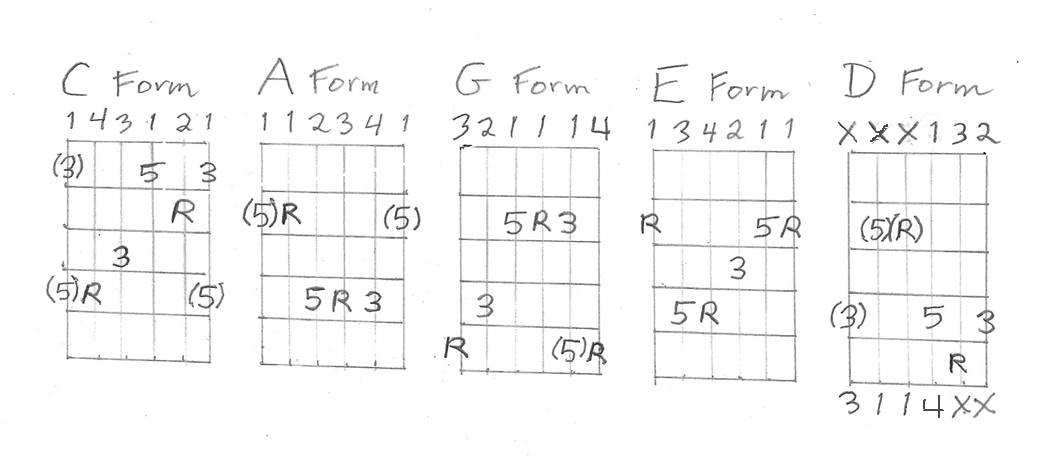
Some of them have optional notes indicated by the interval number in parentheses. It is not necessary to use finger 1 (i.e., index finger on the fretting hand) as a Barre across all six strings because there is usually no need to play all six strings. Think of each of the Forms as a “template” for locating all the allowable notes for playing a desired triad. Just pick at least one root, at least one 3rd and at least one 5th and you get a useful triad. Each form provides many different shapes for the desired triad, depending on the combination of notes selected.
A commonly used shape from the C Form is played on the bottom five strings with finger 1 forming a barre across the bottom three strings. Finger 1 is touching the B string unnecessarily in this case, but we don’t care. On any of the strings, it’s okay to have additional fretting ”in front of” the barre.
A commonly used shape from the A Form is played on the four inner strings. One way to grip it doesn’t require a barre: X1234X (read this as Nothing on the low E string, finger 1 on the A string, finger 2 on the D string, etc.). For that specific shape, however, many guitarists would grip it using finger 3 to form a barre across the D, G and B strings: X1333X. I take that one step further myself because I often include the high E string to enhance the chord voicing by including a 5th “on top” of the chord: X13331. For that grip I use two barres at the same time: Finger 1 to press the A and high E strings, and finger 3 to press the three strings in between. The same shape can also be gripped X12341.
The G form is typically used with finger 1 forming a barre across the D, G and B strings. In fact three such notes by themselves are a useful shape: Major triad in the second inversion (because the lowest note is a 5th). The grip illustrated above for the G Form is appropriate if you want to include the high E string for a root “on top”. Another common grip omits that upper root note: 43111X. This is very useful for quick changes between a chord from the G Form and a chord from the C Form.
Perhaps you already make use of the E Form. It gives us the most-commonly used barre chord, and the voicing using all six strings always sounds great, spanning exactly two octaves.
The D Form is probably the least useful of the five forms because it’s more difficult to form a grip for a “wide” chord across five or six strings. One way to use the D form is to consider it being comprised of two pieces: (1) The familiar D shape on the bottom three strings, and (2) A lower-pitched voicing on the top four strings. For the latter shape, I use finger 1 to form a barre for the notes on the A and D strings. (For the “standard” D forms, see CAGED Chart.)
Now we digress to a lesson that uses some different symbology in the chord diagrams, unfortunately, but the quality of the lesson is worth the effort needed to figure out those diagrams. (The author uses qualified interval numbers, some of which include a small triangle, i.e., Greek letter Delta, to indicate Major.) In the chord diagrams for each of the five forms, pay particular attention to the position of each root note, highlighted in orange in the chord diagrams: https://appliedguitartheory.com/lessons/caged-guitar-theory-system/.
This instructional video is excellent if we excuse the instructor for using the more general term “shape” to refer to each of the five forms: https://www.youtube.com/watch?v=-nphFK6HFjY.
Use the CAGED Chart as a reference. Notice how the five forms are interconnected along the first 12 frets. In combination, the five forms comprise one unified template that can be repeated further up the fretboard (starting at fret 12) or shifted anywhere up or down the fretboard. So, CAGED can be considered a movable “metapattern”.
“Positions”
In guitar nomenclature, use of the simple term “position” is sometimes confusing or unclear. I think the definition of the term should be this: If the Shape to be played includes any open strings, it’s in the open position. Otherwise, the shape has a position number that is the lowest fret number in the shape (relative to the nut or capo). This is typically where finger 1 (index finger) would naturally lie depending on where the shape is being used on the fretboard.
An exception to that narrow definition of position is the use of the compound term root position in the context of chord voicings including inversions. Root position is the chord voicing in which the lowest note is the root, i.e., the voicing is NOT an inversion.
EDCAG
Many guitarists and authors use the term “position” to identify a particular scale pattern (or set of chord shapes) regardless of where it is placed on the fretboard. This can be confusing. Study the lesson at https://www.jazzguitar.be/blog/what-are-guitar-positions and note how the author suggests using the terms “scale pattern 1”, “scale pattern 2”, etc. instead of using his Meaning #2 with the terms “position 1”, “position 2”, etc. Moreover, the author clearly associates each of those five scale shapes (i.e., scale patterns) with its corresponding CAGED form:
· Scale Pattern 1 = Major scale pattern from the E form in CAGED
· Scale Pattern 2 = Major scale pattern from the D form in CAGED
· Scale Pattern 3 = Major scale pattern from the C form in CAGED
· Scale Pattern 4 = Major scale pattern from the A form in CAGED
· Scale Pattern 5 = Major scale pattern from the G form in CAGED
We can visualize the five CAGED forms interconnected along the fretboard with the E form at the lowest fret positions and the G form at the highest fret positions, ordered E, D, C, A and G. Such a metapattern is the EDCAG ordering of the CAGED forms.
In a broad sense, we can think of EDCAG as an expansion of CAGED described by a combined chart including major and minor shapes, all movable. Now we can use the term EDCAG Position with the following precise definitions:
· EDCAG Position 1 = shapes with root notes on strings 6, 4 and 1 = E form or Em shapes
· EDCAG Position 2 = shapes with root notes on strings 4 and 2 = D form or Dm shapes
· EDCAG Position 3 = shapes with root notes on strings 5 and 2 = C form or Cm shapes
· EDCAG Position 4 = shapes with root notes on strings 5 and 3 = A form or Am shapes
· EDCAG Position 5 = shapes with root notes on strings 6, 3 and 1 = G form or Gm shapes